Build a Musical Band
For this project we were assigned to create three musical instruments. These three instruments had to include a string, wind, and percussion instrument and all three had to be able to play all seven notes. The first thing we had to do for this project was to come up with what three instruments we would make. We eventually decided on a bass guitar, piccolo, and bongos.
Bass Guitar:
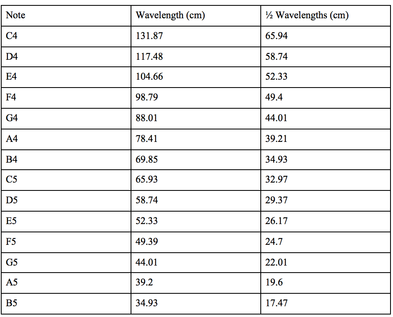
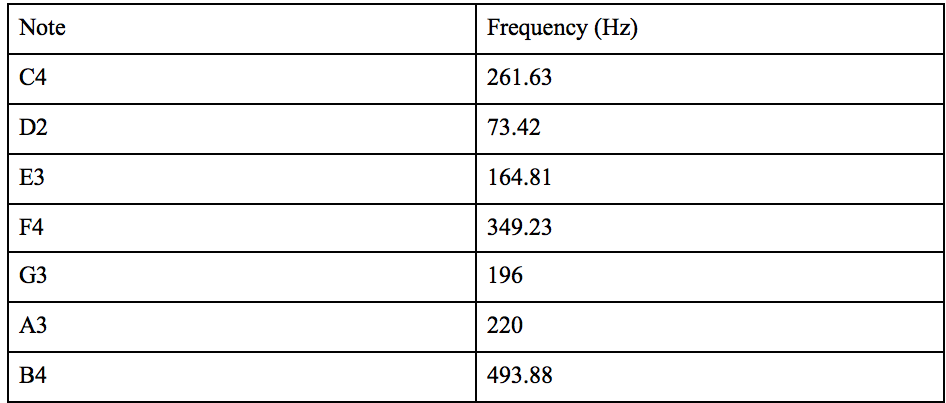
Our bass guitar works by plucking the copper wire, which results in the wire vibrating and making a sound. The sound can be manipulated by either tightening the wire, changing the length of the wire, or changing the thickness of the wire. The main reasons our guitar makes such deep sounds is because the wire is longer, the wire isn't very tight, and the copper wire is fairly thick. The first reason for this is that when a wire is longer it will produce a deeper sound. The second reason is when the wires or strings on a guitar aren't very tight then that also results in a deep sound. The last reason is that the wire we used was a thicker wire which has a lower frequency, resulting in a deeper sound. The way we found where to place the notes on our guitar was by getting the wave length and frequencies of the notes. To do this we found that half of the wave length of the notes is where on the guitar the note needs to be placed. So we found a chart with the wavelengths and frequencies of the notes and we place the notes of the fourth scale (the middle scale) and the fifth scale on our guitar. You can see all our measurements for the note placement below.
Our bass guitar works by plucking the copper wire, which results in the wire vibrating and making a sound. The sound can be manipulated by either tightening the wire, changing the length of the wire, or changing the thickness of the wire. The main reasons our guitar makes such deep sounds is because the wire is longer, the wire isn't very tight, and the copper wire is fairly thick. The first reason for this is that when a wire is longer it will produce a deeper sound. The second reason is when the wires or strings on a guitar aren't very tight then that also results in a deep sound. The last reason is that the wire we used was a thicker wire which has a lower frequency, resulting in a deeper sound. The way we found where to place the notes on our guitar was by getting the wave length and frequencies of the notes. To do this we found that half of the wave length of the notes is where on the guitar the note needs to be placed. So we found a chart with the wavelengths and frequencies of the notes and we place the notes of the fourth scale (the middle scale) and the fifth scale on our guitar. You can see all our measurements for the note placement below.
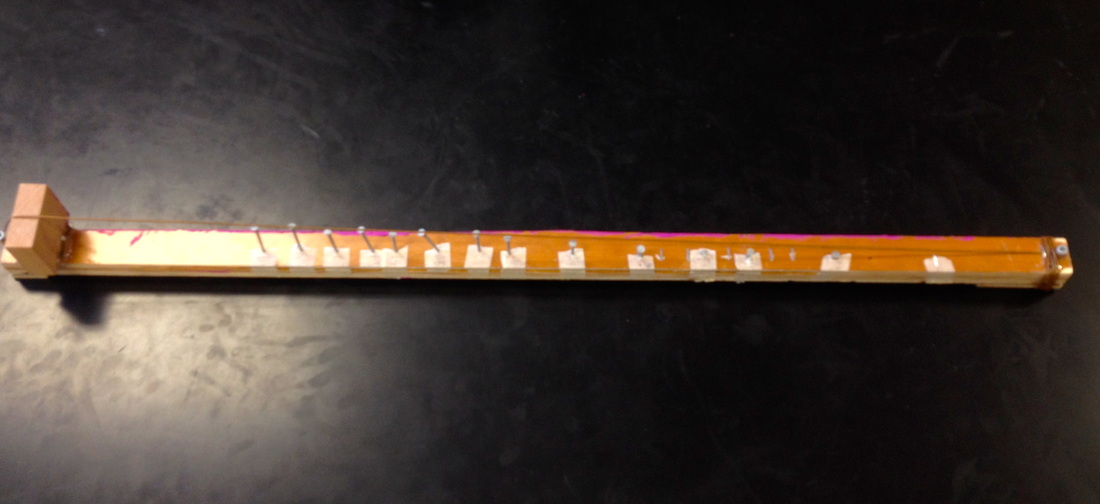
The Bass Guitar
|
|
Piccolo:
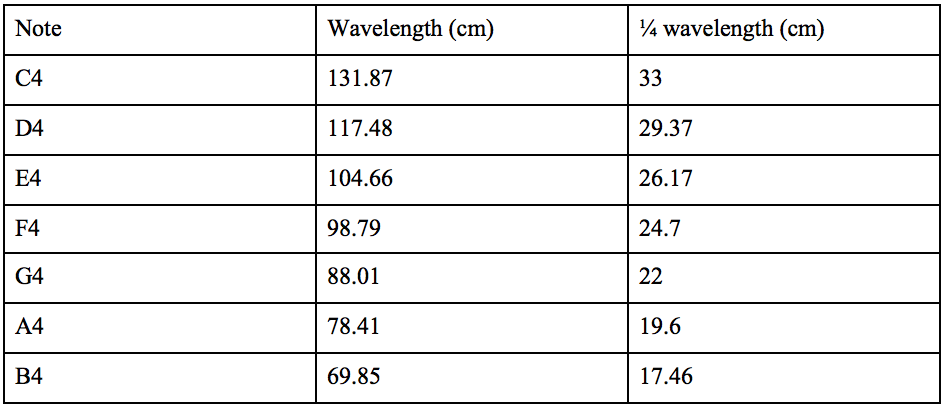
Our piccolo works by blowing air over the hole and making a whistle-like sound. This happens because when you blow air over the hole or mouthpiece of the piccolo, the air that goes in vibrates, which creates the sound waves. By blocking off holes on the pipe, you can lengthen or shorten the wavelength, affecting the pitch of the note. To find where to place these notes we found out that one fourth of the wavelength of the notes is where they need to be placed. So we used information from the same chart as our guitar but instead we converted them into fourths and not halves. For these measurements we started at the end of the pipe and placed the holes in their locations from there. These lengths can work for any cylindrical material but we used pvc pipe since it was the most accessible.
Our piccolo works by blowing air over the hole and making a whistle-like sound. This happens because when you blow air over the hole or mouthpiece of the piccolo, the air that goes in vibrates, which creates the sound waves. By blocking off holes on the pipe, you can lengthen or shorten the wavelength, affecting the pitch of the note. To find where to place these notes we found out that one fourth of the wavelength of the notes is where they need to be placed. So we used information from the same chart as our guitar but instead we converted them into fourths and not halves. For these measurements we started at the end of the pipe and placed the holes in their locations from there. These lengths can work for any cylindrical material but we used pvc pipe since it was the most accessible.
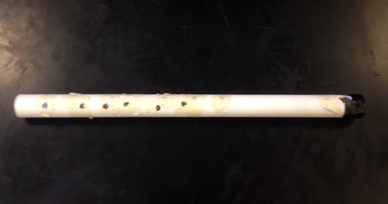
The Piccolo
|
|
Bongos:
As with any other bongos, you hit or tap the top of the drum, which causes a vibration that bounces throughout the hollows section, making a noise. The noise can be changed by how hard you hit the drum, and where you hit the drum. The smaller drum makes higher pitched notes, whilst the larger one makes deeper notes. To find all the notes, we hit the drum, and found the frequency it made. We kept hitting it in different places, and measuring until we had all the required notes. We did that by using a tuner to get the frequencies and then matching them to the correct notes. Normally on a drum like this you should only get one note out of each bongo. The fact that we got all seven notes shows that the natural frequency is different in certain parts of the bongos since the plastic paint cans are thicker or thinner in different parts. The main reason they make different notes is because the thickness of the drum varies, as it was made from a plastic paint can. We also used all the parts of the bongos to get all the notes, such as the side of the drums and the rims of the drums. Since our bongos had different natural frequencies there seven notes were not all in the same scale but all matched up very close to the note frequencies below.
As with any other bongos, you hit or tap the top of the drum, which causes a vibration that bounces throughout the hollows section, making a noise. The noise can be changed by how hard you hit the drum, and where you hit the drum. The smaller drum makes higher pitched notes, whilst the larger one makes deeper notes. To find all the notes, we hit the drum, and found the frequency it made. We kept hitting it in different places, and measuring until we had all the required notes. We did that by using a tuner to get the frequencies and then matching them to the correct notes. Normally on a drum like this you should only get one note out of each bongo. The fact that we got all seven notes shows that the natural frequency is different in certain parts of the bongos since the plastic paint cans are thicker or thinner in different parts. The main reason they make different notes is because the thickness of the drum varies, as it was made from a plastic paint can. We also used all the parts of the bongos to get all the notes, such as the side of the drums and the rims of the drums. Since our bongos had different natural frequencies there seven notes were not all in the same scale but all matched up very close to the note frequencies below.
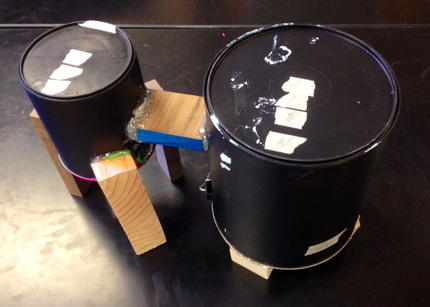
The Bongos
|
|
Physics Concepts:
· Sound Wave- is the vibration created from compression and rarefaction of an object. There are two types of waves, which are Transverse waves and Longitudinal waves. In this project we mainly focused on Transverse waves, which you can see an example of below.
· Sound Wave- is the vibration created from compression and rarefaction of an object. There are two types of waves, which are Transverse waves and Longitudinal waves. In this project we mainly focused on Transverse waves, which you can see an example of below.
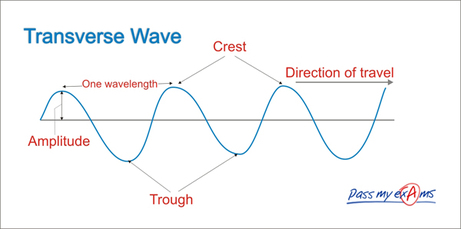
A diagram of a sound wave
· Crest- the highest point of a wave.
· Trough- the lowest point of a wave
· Amplitude- is the distance from the mid point of a wave to the crest or trough.
· Wavelength- is the distance from crest to crest. In our project we used wavelength in the formula of V = W * F to find the length needed for our piccolo and guitar.
· Frequency- is the rate at which a vibration occurs. In our project we used frequency in the formula of V = W * F to find the frequencies our notes should be for our bongos.
· Wave Speed- or a waves velocity, is found by the equation of V = W * F. We used this equation multiple times to find wavelengths and frequencies.
Reflection
For the most part this project went really well. We completed all the instruments on time and all of them made the seven notes. We did have some complications with tuning and volume, but they all still worked. Our group worked together fairly well and they weren’t very many complications. The main things our group could have improved with this project is to use real guitar strings for the guitar and to find a way to amplify its sound more, like adding an air chamber.
One thing I did well in our group was lead the group so we were always doing something worthwhile and not wasting time. A new skill I gained was to string a guitar since I never have before. I also learned that it’s very hard to string a guitar by hand and only using your force. Something I could have done better is to fully explain designs clearly the first time in order to not waste as much time coming up with designs. Another thing I could have done better was to get the right measurements before cutting because originally the piccolo was going to be a flute, but it was a few inches too short resulting in it only making six of the seven notes. Overall this project went very well since everything worked and was done on time.
